instruction manual for orbit timers

Orbit Timer Instruction Manual: A Comprehensive Guide

Welcome! This guide provides detailed instructions for setting up and utilizing your Orbit Timer, ensuring efficient lawn irrigation. Download the B-hyve app for streamlined programming and control, accessing features like zone naming and photographic identification.

Understanding Orbit Timer Basics

Orbit Timers are designed to automate your irrigation system, saving you time and water. These smart controllers, like the B-hyve XD, allow precise scheduling of watering cycles for different zones in your yard. Understanding the core components is crucial for successful operation. The timer itself houses the programming interface and wiring connections, while the B-hyve app provides remote control and advanced features.

Key concepts include zones – representing distinct areas of your lawn or garden – and programs – sets of watering instructions applied to those zones. Multiple programs (A, B, C, D) offer flexibility for varying watering needs throughout the week. Start times dictate when watering begins, and durations determine how long each zone receives water. Properly configuring these elements prevents conflicts and ensures optimal hydration. Remember, zones are sections of your yard, while programs are the schedules applied to them.

What is an Orbit Timer and Why Use One?

An Orbit Timer is a sophisticated irrigation controller that automates your watering schedule, replacing manual operation of your sprinklers. These timers, particularly the smart B-hyve models, connect to your water source and distribute water to designated zones based on pre-programmed settings. They offer a convenient and efficient way to maintain a healthy lawn and garden.

The benefits are numerous. Firstly, water conservation – precise scheduling minimizes waste. Secondly, time savings – eliminate the need for manual watering. Thirdly, plant health – consistent watering promotes robust growth. Furthermore, smart timers like B-hyve offer remote control via a mobile app, allowing adjustments from anywhere. They also provide features like weather-based adjustments and leak detection, enhancing efficiency and preventing damage. Investing in an Orbit Timer is a smart choice for any homeowner seeking a hassle-free and eco-friendly irrigation solution.

Identifying Your Orbit Timer Model

Accurate model identification is crucial for accessing the correct instruction manual and support resources. Orbit offers a diverse range of timers, including mechanical, digital, and smart (B-hyve) models. Your timer’s model number is typically located on a label affixed to the device itself.

Carefully inspect the timer’s casing – look for a sticker on the back, bottom, or inside the battery compartment. The model number is usually a combination of letters and numbers (e.g., 24639 B-hyve XD). Record this number before proceeding.

Once you have the model number, visit the official Orbit website. They provide a dedicated section for downloading manuals. Inputting your model number will direct you to the specific documentation for your timer, ensuring you have the correct instructions for setup, programming, and troubleshooting. Having the right manual will save you time and frustration.

Initial Setup and Wiring

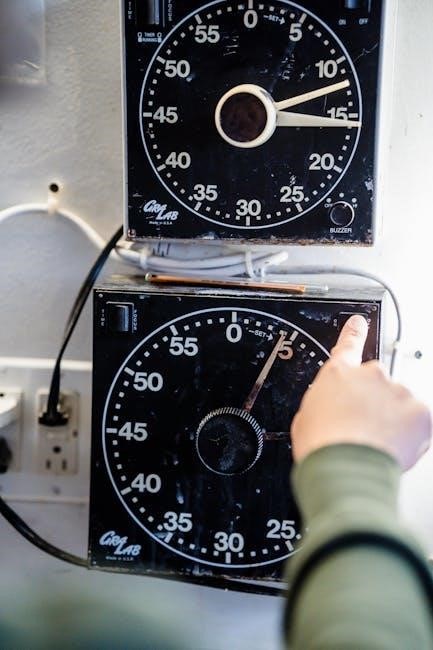
Begin by accessing the wiring panel, carefully exposing the wires. Hold down the reset button located on the back of the timer for proper initialization.

Accessing the Wiring Panel

To begin the setup process, you’ll need to access the wiring panel on your Orbit Timer. This panel houses the connections for your sprinkler zone wires. Typically, this panel is located behind a small, hinged door on the front of the timer unit. Gently open this door to reveal the terminal connections.

Before proceeding, ensure the timer is disconnected from power to prevent any electrical hazards. Carefully examine the wiring configuration inside. You’ll see terminals labeled for each zone (1, 2, 3, 4, etc.) and a common terminal. These terminals are where the wires from your sprinkler valves will connect.

Take a photograph of the existing wiring before making any changes, especially if you’re replacing an old timer. This will serve as a valuable reference point if you encounter any issues during the installation. The wiring panel is crucial for establishing the connection between the timer and your irrigation system, so handle it with care.

Connecting Wires Correctly

Proper wiring is essential for your Orbit Timer to function correctly. Match each zone wire to its corresponding terminal (1, 2, 3, 4, etc.) on the wiring panel. The common wire, usually white, connects to the “C” or common terminal. Ensure each wire is securely inserted into the terminal, tightening the screw firmly but not excessively – avoid stripping the wire.

Double-check your connections against the photograph you took earlier, if applicable. Incorrect wiring can lead to zones not activating or cross-activation, where multiple zones run simultaneously. If you’re unsure about a specific wire, consult the timer’s wiring diagram or seek assistance from a qualified electrician.

Avoid loose connections, as these can cause intermittent operation or signal loss. Once all wires are connected, gently tug on each one to confirm a secure fit. A solid connection ensures reliable control of your sprinkler system, maximizing water efficiency and preventing potential damage.

Resetting Your Orbit Timer

Occasionally, your Orbit Timer may require a reset to clear programming errors or restore factory settings. Locate the reset button on the back of the timer unit – it’s typically a small, recessed button. Use a pen or similar pointed object to gently press and hold the reset button for approximately 5-10 seconds.

During the reset process, the timer’s display may flicker or briefly go blank. Once released, the timer will reboot and return to its initial setup screen. You’ll then need to re-establish the Wi-Fi connection (if applicable) and reprogram your zones and schedules using the B-hyve app.

Resetting doesn’t erase the app’s settings, but it clears the timer’s internal memory. This is useful for troubleshooting connectivity issues or preparing the timer for a new user. Remember to document your previous settings before resetting, to simplify the reprogramming process.

Programming Your Orbit Timer

Effortlessly control your irrigation via the B-hyve app! Define zones, set durations, and avoid conflicts by understanding program and zone distinctions for optimal watering schedules.

Downloading and Using the B-hyve App

Getting Started with the B-hyve App: The B-hyve app is central to controlling your Orbit Timer. Begin by downloading it from your device’s app store (iOS or Android). Once installed, create an account or log in if you already have one. The app will guide you through the process of connecting to your timer – ensure your timer is in pairing mode (often initiated by holding a button on the device).

Navigating the App Interface: The app’s main screen displays your connected timers. Select your timer to access its programming options. You’ll find sections for zones, programs, and settings. The app allows you to manually activate zones for testing purposes. A key step is walking through the app’s setup, turning on each zone individually to name it and even upload a photograph for easy identification. This visual cue is incredibly helpful when managing multiple zones.

Accessing Existing Programs: If you’ve purchased a timer from a previous owner, attempt to gain manager access by requesting the access code from them. Entering this code will restore all previously configured programs and settings, saving you significant setup time.

Zone vs. Program Understanding

Demystifying Zones and Programs: It’s crucial to differentiate between “zones” and “programs” within the Orbit Timer system. Zones represent the distinct sections of your yard requiring irrigation – for example, front lawn, back garden, or shrubbery. Each zone corresponds to a specific valve controlling water flow to that area.

Programs Define Schedules: Programs, conversely, define the schedule for watering these zones. You can have multiple programs (A, B, C, D) to accommodate different watering needs throughout the week or season. Think of programs as overarching schedules and zones as the recipients of those schedules.

Avoiding Confusion: Many Orbit timers feature 4-8 zones, but commonly utilize only two programs (A and B). Avoid assigning start times to zones beyond the first few, as the timer automatically sequences through them. Focus on setting durations for each zone, letting the timer manage the start times based on the programmed sequence. This prevents conflicts and ensures proper watering.

Setting Zone Durations (Avoiding Start Time Conflicts)

Mastering Zone Durations: When programming your Orbit Timer, prioritize setting accurate durations for each zone rather than rigidly defining individual start times, especially for zones beyond the first one or two. The timer is designed to automatically sequence through zones, initiating each after the previous one completes its cycle.

Preventing Overlap: Attempting to assign specific start times to multiple zones can lead to conflicts and unpredictable watering patterns. The timer may become “confused” if it perceives overlapping schedules, potentially running zones simultaneously or extending their duration unexpectedly.

Duration-Based Approach: Instead, focus on determining the optimal watering time for each zone based on plant type, soil conditions, and sprinkler head output. Let the timer handle the sequencing, ensuring a smooth and efficient watering schedule. This approach simplifies programming and minimizes potential errors.

Naming and Photographing Zones within the App

Personalizing Your Zones: The B-hyve app offers a fantastic feature – the ability to name and photograph each watering zone. This visual and descriptive approach dramatically simplifies management, especially for complex irrigation systems. After accessing your timer within the app, a guided setup process will prompt you to individually activate each zone.

Visual Identification: As each zone operates, take a clear photograph representing that area of your yard. This visual cue instantly clarifies which part of your landscape each zone controls. Pair this with a descriptive name – for example, “Front Lawn,” “Rose Garden,” or “Back Patio.”

Streamlined Control: These personalized labels and images make adjusting schedules, troubleshooting issues, and understanding your watering system incredibly intuitive. No more guessing which zone corresponds to which area of your property!

Advanced Programming Features

Unlock Full Potential: Explore multiple programs (A, B, C, D) and automatic sequencing for customized watering schedules. Effective start time management optimizes water usage efficiently.

Utilizing Multiple Programs (A, B, C, D)

Program Versatility: Your Orbit Timer often features four independent programs – A, B, C, and D – allowing for highly customized watering schedules tailored to different needs within your yard. Think of each program as a separate watering plan. For example, Program A could be dedicated to your front lawn, requiring frequent, shorter watering cycles, while Program B might be reserved for your vegetable garden, needing less frequent but longer, deeper watering.

Programs C and D offer further segmentation, perhaps for flowerbeds and trees respectively. You can activate one, several, or all programs simultaneously, or schedule them to run on different days or at different times. This flexibility is crucial for optimizing water usage based on plant type, sun exposure, and soil conditions. Remember, even if you don’t immediately need all four programs, having them available provides future scalability and control over your irrigation system. Experiment to find the optimal configuration for your landscape!

Managing Start Times Effectively

Strategic Scheduling: Careful management of start times is paramount for efficient watering and preventing conflicts. Avoid overlapping start times for different zones, especially if utilizing automatic sequencing. A common mistake is scheduling zones with close start times and durations, leading to confusion and potentially continuous operation. Instead, leverage the duration settings and allow the timer to automatically progress through zones sequentially.

Consider your local water pressure and flow rate when setting start times. If pressure drops significantly when multiple zones run simultaneously, stagger start times to maintain adequate water delivery to each area. Furthermore, early morning watering (before sunrise) minimizes evaporation and maximizes water absorption. Avoid watering during peak sunlight hours. The B-hyve app simplifies this process, providing a clear visual representation of your schedule and potential conflicts.

Understanding Automatic Sequencing

Sequential Operation: Orbit timers, particularly with the B-hyve system, often feature automatic sequencing. This means once a zone completes its scheduled run time, the timer automatically initiates the next zone in the program, without requiring individually set start times for each. This simplifies programming, especially with multiple zones. However, understanding this feature is crucial to avoid unexpected behavior.

If you’ve assigned a start time to every zone, the timer might become confused, potentially running zones continuously. The key is to define a start time for the first zone only, and then rely on the programmed durations to dictate the sequence. The timer inherently knows to move to the next zone after the current one finishes. Remember, zones are the sections of your yard, while programs (A, B, C, D) are different watering schedules you create. Utilizing this sequencing effectively streamlines your irrigation process.

Troubleshooting Common Issues

Facing problems? Check faucet connections for leaks, reset the timer using the button on the back, and verify the B-hyve app is functioning correctly.

Addressing Leaks at the Faucet Connection

Identifying the Source: A leak at the faucet connection is a common issue, especially after winter storage. First, ensure the timer is securely attached to the faucet and the hose is firmly connected to the timer’s outlet. Inspect the rubber gasket or O-ring within the connection point – this is often the culprit.

Troubleshooting Steps: If the gasket appears damaged or worn, it needs replacement. Orbit timers typically have a two-year warranty, so contacting customer support for a replacement part is a viable option. Before replacing, try tightening the connection slightly, but avoid over-tightening, which can cause further damage.

Preventative Measures: To prevent future leaks, consider using Teflon tape on the faucet threads before attaching the timer. Proper winterization, including disconnecting the timer and storing it indoors, also helps maintain the gasket’s integrity. If the leak persists after these steps, a complete hose attachment replacement might be necessary.

Warranty Information and Part Replacement

Orbit Timer Warranty: Your Orbit Timer is covered by a two-year warranty against defects in materials and workmanship from the date of purchase. This warranty doesn’t cover damage resulting from misuse, improper installation, or failure to follow instructions. Proof of purchase is required for all warranty claims.

Obtaining Warranty Service: To initiate a warranty claim, contact Orbit’s customer support through their website or by phone. Be prepared to provide your model number and a detailed description of the issue. They may request photos or videos to assess the problem.

Part Replacement: Replacement parts, such as gaskets, hose connectors, and even entire timer units, can often be obtained directly from Orbit’s website or authorized retailers. When ordering, ensure you have the correct model number to guarantee compatibility. For specific issues like a leaking hose attachment, requesting the exact replacement part is recommended.

Setting the Clock on Your Orbit Timer

Initial Clock Setup: Before programming your Orbit Timer, accurately setting the clock is crucial for proper operation. The B-hyve app simplifies this process significantly. Ensure your timer is connected to your Wi-Fi network and paired with the app on your smartphone or tablet.

Using the B-hyve App: Within the app, navigate to the timer settings. You’ll find an option to manually set the current time and date. The app will guide you through each step, ensuring accuracy. Some models may automatically synchronize with network time, eliminating manual input.

Manual Adjustment (If Needed): If manual adjustment is necessary, carefully input the correct time and date. Double-check your entries before saving. Accurate timekeeping is essential for scheduled watering cycles to begin at the desired times. A correctly set clock is the foundation of automated irrigation.

relion premier classic manual

ReliOn Premier Classic Manual: A Comprehensive Guide

This guide provides detailed instructions for using the ReliOn Premier Classic meter, covering setup, testing procedures, and troubleshooting.
It ensures accurate blood glucose monitoring,
and supports effective diabetes management.

The ReliOn Premier Classic is a user-friendly blood glucose monitoring system designed for individuals managing diabetes. This meter provides accurate and reliable blood glucose readings, empowering you to make informed decisions about your health. It’s readily available and HSA/FSA eligible, making healthcare more accessible.

Understanding how to properly use your meter is crucial for effective diabetes management. This system requires careful attention to detail, particularly regarding calibration – some users have noted the instructions emphasize calibration with each new test strip container. The meter automatically turns on when a test strip is inserted, simplifying the testing process.

Beyond the meter itself, the system includes essential components for accurate testing. Regularly checking your blood glucose levels, as demonstrated in available YouTube tutorials, allows for proactive health management. Proper date and time settings, easily adjusted as shown in online guides, ensure accurate record-keeping.

Understanding the Kit Contents

The ReliOn Premier Classic kit typically includes the blood glucose meter itself, a lancing device for obtaining blood samples, and a supply of lancets. Crucially, the kit does not include test strips – these are sold separately. This modular approach allows users to purchase only the strips they need, optimizing cost-effectiveness.

Familiarize yourself with each component before beginning testing. The meter features a test strip port designed for easy insertion, automatically powering on when a strip is correctly placed. The lancing device allows for adjustable penetration depth, catering to different skin types.

While control solutions aren’t always included, they are available for purchase and are recommended to verify the meter’s accuracy, especially when opening a new box of test strips. Understanding the function of each item ensures a smooth and reliable testing experience, contributing to effective diabetes management. Proper storage of these components is also vital for maintaining their functionality.

Setting Up the Meter: Date and Time

Accurate date and time settings are essential for proper data logging and tracking of blood glucose readings with the ReliOn Premier Classic meter. Upon initial use, or after battery replacement, the meter will prompt you to set the current date and time. This is typically achieved through a series of button presses, navigating through the month, day, year, hour, and minute settings.

Refer to the user manual for the specific button sequence, as it can vary slightly. Setting the correct date and time allows for accurate record-keeping, enabling you and your healthcare provider to identify trends and patterns in your blood glucose levels.

YouTube tutorials demonstrate this process visually, offering a helpful guide for those who prefer a step-by-step video demonstration. Correctly configured date and time settings are fundamental to maximizing the meter’s functionality and ensuring reliable data for informed diabetes management.

Inserting the Test Strip

Proper test strip insertion is crucial for obtaining accurate blood glucose readings with the ReliOn Premier Classic meter. The test strip features contact bars that must be correctly oriented and fully inserted into the meter’s test strip port. Ensure the contact bars are facing upwards during insertion.

Gently push the strip into the port until the meter automatically powers on and displays a specific symbol, indicating it’s ready for a blood sample. Do not force the strip; a smooth, complete insertion is key. An improperly inserted strip can lead to inaccurate results or error messages.

Always check the user manual for a visual guide to ensure correct orientation. The meter is designed to recognize a properly inserted strip and prepare for testing, streamlining the blood glucose monitoring process.

Calibration Requirements

Calibration of the ReliOn Premier Classic meter ensures the accuracy of your blood glucose readings. While some users report not calibrating frequently, the original instructions included with the meter specifically state that calibration is mandatory before initial use.

Furthermore, the meter must be calibrated each time a new container of test strips is opened. This is because each batch of test strips may have slight variations, and calibration adjusts the meter to compensate. Calibration involves using a control solution with a known glucose concentration.

Regular calibration, especially with new strip containers, minimizes the risk of inaccurate results, providing confidence in your blood glucose monitoring. Ignoring calibration requirements can compromise the reliability of your readings and potentially impact your diabetes management decisions.

When to Calibrate the Meter

Calibration of your ReliOn Premier Classic meter is crucial for accurate results. Initially, calibrate the meter before your very first blood glucose test to establish a baseline. More importantly, always calibrate whenever you open a new container of test strips. Each batch can vary slightly, and calibration adjusts for these differences.

While some users on forums discuss foregoing calibration after initial setup, the manufacturer’s instructions clearly emphasize its necessity with each new strip container. Consider calibrating if you suspect the meter is malfunctioning or if readings seem inconsistent with how you feel.

Consistent calibration, particularly with new strips, ensures reliable data for effective diabetes management. Don’t hesitate to calibrate if you’re unsure – it’s a simple step that can significantly improve the accuracy of your readings and your peace of mind.

Using Control Solutions

Control solutions are essential for verifying your ReliOn Premier Classic meter and test strips are functioning correctly. These solutions, available for purchase separately, contain a known glucose concentration. By testing the control solution, you can confirm the meter provides results within the expected range.

To use, gently shake the control solution bottle and apply a small drop to the test strip as if it were a blood sample. Compare the displayed result to the range printed on the control solution vial. If the result falls outside this range, it indicates a potential issue with the meter, test strips, or testing technique.

Regularly using control solutions – especially when opening new test strip containers or if you suspect inaccuracies – provides confidence in your blood glucose readings. It’s a proactive step towards reliable self-monitoring and informed diabetes management.

Performing a Blood Glucose Test

To begin, wash your hands thoroughly with soap and warm water, then dry them completely. Insert a test strip into the meter’s test strip port, ensuring the contact bars face upwards. The meter will automatically power on, displaying a readiness symbol.

Using a lancing device, obtain a small blood sample – typically from a fingertip. Gently touch the edge of the test strip to the blood drop; the strip will draw the sample in automatically. Avoid smearing the blood.

Hold the strip in place until the meter displays your blood glucose result. This usually takes just a few seconds. Remember to properly dispose of used lancets and test strips in a sharps container. Consistent technique ensures accurate readings.

Interpreting Your Results

Understanding your blood glucose readings is crucial for effective diabetes management. The ReliOn Premier Classic displays results in milligrams per deciliter (mg/dL). Generally, a reading before meals should fall between 80-130 mg/dL, and 1-2 hours after meals, below 180 mg/dL.

However, target ranges can vary based on individual needs and healthcare provider recommendations. High readings may indicate the need for dietary adjustments, increased physical activity, or medication adjustments. Low readings require immediate attention to prevent hypoglycemia.

Keep a log of your results, noting the time of day, meals consumed, and any physical activity. Share this log with your doctor to refine your diabetes management plan. Consistent monitoring and interpretation are key to maintaining optimal health.

Understanding Error Codes

The ReliOn Premier Classic meter utilizes error codes to signal potential issues during testing. These codes help identify problems with the meter, test strip, or testing technique. Common codes include “LO” indicating a test strip issue, or insufficient sample, and “HI” suggesting a result exceeding the meter’s range.

“Err” may appear if the test strip is damaged or improperly inserted. If you encounter an error code, first re-test with a fresh strip, ensuring adequate blood sample application. Verify the strip’s expiration date and proper storage.

If the error persists, consult the meter’s user manual for a comprehensive list of codes and troubleshooting steps. Contacting ReliOn customer support is recommended for unresolved issues. Ignoring error codes can lead to inaccurate readings and compromised diabetes management.

Test Strip Storage and Handling

Proper storage and handling of ReliOn Premier Classic test strips are crucial for accurate blood glucose readings. Always store strips in their original vial, tightly closed, in a cool, dry place, away from direct sunlight and heat. Avoid temperatures above 86°F (30°C).

Do not freeze test strips. Exposure to humidity can damage the strips, leading to inaccurate results. Never transfer strips to a new container, as this can compromise their integrity. Inspect each strip before use; discard any that appear damaged or discolored.

Only use strips within their expiration date, printed on the vial. Using expired strips can significantly affect accuracy. Handle strips with clean, dry hands to prevent contamination. Proper handling ensures reliable results for effective diabetes management.

Battery Replacement

The ReliOn Premier Classic meter requires batteries for operation. When the low battery indicator appears on the display, it’s time for a replacement. The meter typically uses two AAA batteries. To replace them, gently slide off the battery cover located on the back of the meter.

Remove the old batteries and insert new AAA batteries, ensuring correct polarity as indicated inside the battery compartment (+ and -). Replace the battery cover securely. Incorrect battery installation can damage the meter.

Dispose of used batteries properly, following local regulations. Battery life varies depending on usage and storage conditions. Regularly check the battery level to avoid interruptions in testing. A fresh set of batteries ensures consistent and reliable performance of your blood glucose meter.

Meter Maintenance and Cleaning

Regular maintenance ensures the longevity and accuracy of your ReliOn Premier Classic meter. To clean the meter, gently wipe the exterior with a soft, dry cloth. Avoid using harsh chemicals, abrasive cleaners, or excessive moisture, as these can damage the device.

Do not immerse the meter in water or any other liquid. Pay particular attention to the test strip port, ensuring it remains free from debris. Inspect the battery compartment for any signs of corrosion and clean if necessary;

Store the meter in a clean, dry place, away from extreme temperatures and humidity. Avoid dropping or subjecting the meter to strong impacts. Proper care and cleaning contribute to reliable performance and accurate blood glucose readings over time.

HSA/FSA Eligibility

The ReliOn Premier Classic Blood Glucose Monitoring System is designed to be accessible and affordable for managing diabetes. A significant benefit is its eligibility for use with Health Savings Accounts (HSAs) and Flexible Spending Accounts (FSAs).

This means you can utilize pre-tax dollars from these accounts to purchase the meter, test strips, and control solutions, potentially reducing your out-of-pocket healthcare expenses. Always verify current eligibility requirements with your HSA or FSA provider, as rules can change.

Walmart.com specifically notes the system’s HSA/FSA eligibility, making health and wellness purchases more manageable for individuals and families. Keeping accurate records of your purchases is recommended for tax purposes. Utilizing these accounts can significantly ease the financial burden of diabetes care.

Troubleshooting Common Issues

Encountering issues with your ReliOn Premier Classic meter can be frustrating, but many problems have simple solutions. If the meter doesn’t turn on, ensure the batteries are correctly installed and have sufficient charge. A common concern is calibration; the instructions emphasize calibration before first use and with each new test strip container.

If you receive error codes, consult the meter’s documentation to understand their meaning. Inaccurate readings might stem from expired or improperly stored test strips. Ensure strips are within their expiration date and stored correctly.

If issues persist, consider checking online forums like the Feline Diabetes Message Board (FDMB) for shared experiences and potential fixes. Remember to always prioritize safety and consult a healthcare professional if you have concerns about your blood glucose readings or the meter’s functionality.

Safety Precautions

When using the ReliOn Premier Classic, prioritize safety to ensure accurate results and prevent complications. This device is intended for in-vitro diagnostic use only. Never share your lancing device with others, as this can lead to infection transmission. Always use a fresh, sterile lancet for each test.

Properly dispose of used lancets and test strips in a sharps container, following local regulations. Avoid touching the blood sample to your skin or eyes. If blood gets into your eyes or onto your skin, rinse thoroughly with water.

Keep the meter and test strips out of reach of children. Do not attempt to disassemble or repair the meter yourself. If you experience any adverse reactions, discontinue use and consult a healthcare professional immediately. Always follow your healthcare provider’s instructions regarding blood glucose monitoring.

Where to Find Additional Support

For comprehensive assistance with your ReliOn Premier Classic, several resources are readily available. Walmart’s customer service offers support via phone and online chat, addressing questions about the device and test strip availability. Numerous online forums, like the Feline Diabetes Message Board (FDMB), provide user experiences and troubleshooting tips – though remember to verify information with a healthcare professional.

YouTube channels offer visual guides, such as tutorials on setting the time and date, or performing blood glucose tests. ManualsLib hosts digital copies of the ReliOn PREMIER CLASSIC User Manual, offering detailed instructions.

Your healthcare provider remains your primary source for personalized guidance on diabetes management and interpreting your results. Don’t hesitate to reach out to them with any concerns. Additionally, explore the ReliOn website for FAQs and further support materials.

manual die cutter

Manual Die Cutters: A Comprehensive Guide (Updated 04/07/2026)

Today, 04/07/2026, explore manual die cutters like Sizzix Big Shot and Spellbinders Platinum 6, enhancing crafting with consistent pressure and extended plate life using magnetic mats․

What is a Manual Die Cutter?

Manual die cutters are mechanical tools used for cutting shapes from various materials like paper, cardstock, and vellum․ Unlike their powered counterparts, they rely on human force to create precise designs․ These machines utilize metal dies – often intricate in design – that act as stencils, forcing the material through cutting plates when pressure is applied․

Historically, die cutting involved laborious hand-cutting with scissors, a slow and often imprecise process․ Manual die cutters offer a significant improvement, providing cleaner cuts and repeatable designs; They bridge the gap between slow manual methods and the skill required for power knives․ Machines like the Sizzix Big Shot and Spellbinders Platinum 6 exemplify this, offering crafters a versatile and accessible way to create detailed shapes for projects like junk journals, cards, and mini albums․

The History of Manual Die Cutting

Die cutting’s origins trace back to the 19th century, initially employed in industrial settings for mass production of shapes from materials like leather and paperboard․ Early methods were far from the convenient tools crafters use today, relying on heavy machinery and skilled operators․

The evolution towards manual die cutting for hobbyists gained momentum with the introduction of machines like the Sizzix Big Shot in the early 2000s․ This brought the precision of die cutting to a wider audience․ Before this, crafters relied on tedious hand-cutting with scissors․ Subsequent innovations, such as the Spellbinders Platinum 6, further refined the process, addressing issues like inconsistent pressure and offering enhanced capabilities for techniques like foiling․ These advancements democratized intricate design creation, fueling the growth of paper crafting․

Types of Manual Die Cutters Available

The market offers diverse manual die cutters catering to varied crafting needs․ Sizzix Big Shot & Big Shot Foldaway are popular choices, known for versatility and a wide range of die compatibility․ The Big Shot Foldaway prioritizes portability, ideal for crafters with limited space․

Spellbinders Platinum 6 stands out with its precision and ability to handle intricate designs, particularly excelling with foiling techniques․ Beyond these, other popular brands & models exist, often differing in opening sizes (6” or 9”) to accommodate larger dies and embossing folders․ Choosing depends on project scale and desired features; larger openings suit expansive designs, while standard sizes suffice for cards and smaller projects․

Sizzix Big Shot & Big Shot Foldaway

The Sizzix Big Shot remains a cornerstone for many crafters, celebrated for its robust build and compatibility with a vast library of Sizzix dies and embossing folders․ Its 6” opening is versatile for standard cardmaking and scrapbooking projects․ The Big Shot Foldaway builds upon this foundation, adding the crucial benefit of portability․

Its folding design allows for easy storage and transport, making it ideal for workshops or crafting on the go․ However, users sometimes encounter inconsistent pressure, particularly when foiling, requiring adjustments like tightening the handle’s hex nut․ Despite this, the Big Shot’s accessibility and wide support make it a favored choice․

Spellbinders Platinum 6

The Spellbinders Platinum 6 emerges as a compelling alternative, particularly noted for its consistent pressure – a common issue with some Big Shot models when used with foiling techniques․ Many users switching from Sizzix, experiencing foil quality problems, have found the Platinum 6 delivers superior results․

Its 6” opening accommodates a wide range of dies and embossing folders, and it’s specifically designed to work seamlessly with the Glimmer Hot Foil system․ Often available on sale, the Platinum 6 represents a strong value proposition․ It’s praised for reliability and minimizing the need for frequent plate changes, especially when paired with a magnetic magic mat․

Other Popular Brands & Models

Beyond Sizzix and Spellbinders, the manual die-cutting landscape includes various brands catering to diverse needs․ While specific models weren’t explicitly mentioned, the need for machines with larger openings – 9” – was highlighted for those working with extra-large embossing folders․

Exploring options beyond the dominant players can uncover unique features or price points․ The choice often depends on the scale of projects and desired capabilities․ Remember, a 6” opening is generally sufficient for embossing, but larger formats require dedicated machines․ Researching user reviews and comparing specifications is crucial for finding the perfect fit for your crafting style․

Key Components of a Manual Die Cutter

Essential parts include cutting plates, a die release folder, the handle and gears for pressure, and adjustable knobs to control settings for varied materials․

Cutting Plates

Cutting plates are fundamental to the die-cutting process, forming the core surface against which dies create impressions․ Typically, a set includes a top plate, a bottom plate, and sometimes an additional shim for textured impressions or thicker materials․

These plates must be consistently maintained to ensure optimal performance․ Warping is a common issue, dramatically impacting cut quality; however, utilizing a magnetic magic mat from sources like scrapbook․com can significantly reduce warping and extend plate lifespan – some users report two years of use with the same top plate!

Proper storage is also crucial․ Regular cleaning and maintenance will help preserve their integrity, ensuring consistent pressure and preventing inconsistencies when foiling or embossing․

Die Release Folder

The die release folder, often a textured plastic sheet, plays a vital role in cleanly separating the die-cut image from the die itself․ It’s positioned within the “sandwich” of plates and dies, facilitating the release process and preventing delicate designs from tearing or sticking;

This component is particularly important when working with intricate dies or sticky materials like adhesive sheets․ A quality release folder ensures a smooth, effortless removal of the die-cut, preserving the detail and integrity of your creation․

While often overlooked, the condition of the release folder impacts the final result․ Maintaining a clean and undamaged folder contributes to consistent, professional-looking die cuts․

Handle & Gears

The handle and gear system are the power source of a manual die cutter, converting your physical effort into the consistent pressure needed for cutting․ A smooth, reliable handle rotation is crucial for clean die-cuts․ Issues often arise from a loose hex nut on the handle, impacting pressure and foil quality, as experienced with the Big Shot Plus and Glimmer machine․

The gears themselves must be properly aligned and maintained․ Regular inspection ensures efficient operation and prevents stalling․ Consistent cranking pressure is key; uneven force can lead to inconsistent results․

A well-maintained handle and gear system guarantees longevity and optimal performance of your die-cutting machine․

Adjustable Knobs & Settings

Adjustable knobs on manual die cutters control the pressure applied during the cutting process, vital for different materials․ Machines with a 6-inch opening are generally sufficient for embossing, while a 9-inch opening accommodates larger embossing folders․ These settings impact the quality of both die-cuts and embossed designs․

Understanding how these knobs function is crucial for achieving desired results․ Inconsistent pressure, a common issue, can ruin foiling projects․ Fine-tuning these settings allows for versatility, adapting the machine to cardstock, vellum, or foil․

Proper adjustment ensures clean cuts and beautifully textured impressions․

Using a Manual Die Cutter: A Step-by-Step Guide

Begin by preparing dies and paper, then “sandwich” them between cutting plates․ Apply consistent pressure by cranking the handle, and carefully release your die-cut!

Preparing Your Materials (Dies, Paper, etc․)

Before you begin your die-cutting journey, meticulous preparation is key to achieving flawless results․ First, select your desired die – these come in countless shapes and sizes, offering endless creative possibilities․ Next, choose your paper or cardstock; consider the weight and texture for optimal cutting;

Ensure your die is clean and free of any debris that could affect the cut quality․ For intricate designs, a slightly heavier weight cardstock often performs best․ Gather your cutting plates, a die release folder, and familiarize yourself with the machine’s sandwich configuration․ Having everything readily available streamlines the process and minimizes frustration․ Remember, proper material selection sets the stage for a successful die-cutting experience!

Sandwiching the Die & Material

Creating the “sandwich” is crucial for successful die-cutting․ Begin with a cutting plate as the base․ Then, carefully layer your chosen material – cardstock, paper, or specialty media – onto the plate․ Position your die, steel-rule blade side up, directly over the area you wish to cut․

Next, cover the die with a die release folder; this protects your die and aids in easy removal․ Finally, top with the second cutting plate․ This layered configuration ensures even pressure distribution during cranking․ Incorrect layering can lead to incomplete cuts or damage to your die․ A properly constructed sandwich guarantees clean, precise die-cuts every time, maximizing your machine’s potential․

Cranking the Handle: Applying Consistent Pressure

Consistent pressure is paramount when using a manual die cutter․ Slowly and steadily turn the handle, applying even force throughout the entire rotation․ Avoid jerking or stopping mid-crank, as this can result in uneven cuts and potentially damage your dies or machine․

If encountering resistance, do not force it; check your sandwich layering․ A smooth, controlled crank ensures the die cuts cleanly through your material․ Remember, the machine relies on your consistent effort․ For foil application, consistent pressure is even more critical to achieve a professional, flawless finish․ A stable machine, potentially with a tightened hex nut, aids this process․

Releasing the Die Cut

Carefully remove the cutting plates after cranking․ Gently separate the top plate, revealing the die-cut design embedded within the material․ Avoid pulling forcefully, as this can tear delicate shapes․ Use a die release folder or a similar tool to assist in cleanly lifting the die-cut from the die itself․

Inspect the cut for any imperfections; inconsistent pressure during cranking may require a retry․ Remember, some materials, like intricate foil designs, require extra patience․ Properly releasing the die cut preserves both the design and the longevity of your valuable dies․ A magnetic mat can also aid in easier release and reduce warping․

Troubleshooting Common Issues

Address inconsistent pressure, warped plates, handle malfunctions (tighten the hex nut!), and machine stalling for optimal die-cutting performance and consistent results․

Inconsistent Pressure & Foil Quality

Experiencing frustratingly poor foil transfer? Inconsistent pressure is a common culprit when using manual die cutters, particularly with machines like the Sizzix Big Shot Plus and Glimmer machine․ Users report that achieving even foil application can be challenging, resulting in patchy or incomplete coverage․

Fortunately, a solution often lies in ensuring proper machine maintenance․ Tightening the hex nut on the handle can significantly improve pressure consistency․ Switching to a Spellbinders Platinum 6, known for its reliable pressure, is another effective remedy․ Remember, consistent pressure is key to achieving professional-looking foiled designs, so address this issue promptly for beautiful results!

Warped Cutting Plates

Warped cutting plates are a frequent issue for manual die cutter users, diminishing cutting performance and overall machine efficiency․ Over time, plates can bend and distort, leading to uneven cuts and difficulty processing materials․ However, a simple solution exists to dramatically extend plate lifespan: the Magnetic Magic Mat․

Available at scrapbook․com, this innovative mat replaces one cutting plate, reducing warping significantly․ Users have reported using the same top plate for two years with the aid of a Magic Mat! Proper storage is also crucial; avoid stacking plates improperly․ Addressing warped plates proactively ensures consistent, high-quality die-cutting results․

Handle Malfunctions (Hex Nut Tightening)

Occasional handle malfunctions can plague manual die cutters, particularly the Sizzix Big Shot; A common fix involves tightening the “hex nut” – a crucial adjustment for maintaining proper gear engagement and consistent pressure․ When the handle feels loose or the machine struggles, this is often the first step to take․

One user reported that tightening this nut on their Big Shot restored functionality when it stopped working effectively with a Glimmer machine․ Ensuring this nut is secure guarantees smooth cranking and optimal force application․ Regularly checking and tightening this component can prevent frustrating interruptions and prolong the machine’s operational life․

Die Cutting Machine Stalling

Experiencing a stalling die cutting machine can be incredibly frustrating․ Often, this issue stems from inconsistent pressure during the cranking process, particularly when using foil or intricate dies․ Insufficient force prevents a clean cut, causing the machine to bind and halt․ Addressing this requires ensuring even pressure throughout the entire crank․

Furthermore, warped cutting plates contribute significantly to stalling․ Utilizing a magnetic magic mat from scrapbook․com can dramatically reduce warping, extending plate life and improving performance․ If stalling persists, revisit the hex nut tightening procedure, as a loose connection impacts gear engagement and overall power transfer․

Extending the Life of Your Cutting Plates

Employ magnetic magic mats to minimize warping, ensuring two years of use from a single top plate, alongside proper storage and cleaning routines․

Magnetic Magic Mats & Their Benefits

Magnetic magic mats, available from retailers like scrapbook․com, represent a significant advancement in maintaining the longevity of your manual die cutter’s plates․ These innovative mats function by replacing one of the standard cutting plates within the machine’s sandwich configuration․

The primary benefit lies in their ability to dramatically reduce plate warping, a common issue that leads to inconsistent cuts and diminished performance․ By providing a stable, magnetic surface, the mat counteracts the pressure and stress applied during die-cutting․

Users report extending the lifespan of their plates considerably – one individual successfully used a magnetic mat for two years before needing replacement․ This translates to cost savings and reduced maintenance, making them a worthwhile investment for serious crafters․

Proper Plate Storage

Protecting your cutting plates when not in use is crucial for maintaining their flatness and ensuring consistent die-cutting performance․ Improper storage can lead to warping and damage, diminishing their effectiveness over time․

Avoid stacking plates directly on top of each other without any protection․ Instead, interleave them with acid-free paper or cardstock to prevent scratches and pressure points․ A dedicated plate storage box or sleeve is an excellent investment․

Store plates in a cool, dry environment, away from direct sunlight and extreme temperatures․ Humidity can contribute to warping, while excessive heat can cause deformation․ Proper storage safeguards your investment and extends plate life․

Cleaning & Maintenance of Plates

Regular cleaning is essential for optimal die-cutting performance and prolonging the life of your plates․ Residue from adhesives, paper fibers, and foil can build up, affecting the cutting quality and potentially damaging the plate surface․

Use a soft, lint-free cloth lightly dampened with isopropyl alcohol to gently wipe down the plates after each use․ Avoid abrasive cleaners or harsh chemicals, as these can scratch or corrode the surface․

Inspect plates regularly for any signs of damage, such as scratches, dents, or warping․ Addressing minor issues promptly can prevent them from escalating into more significant problems․ Consistent maintenance ensures smooth operation․

Die Cutting Materials: What Works Best?

Cardstock of varying weights excels, while vellum and foil add unique textures․ Avoid excessively thick or fibrous materials for optimal results․

Cardstock & Paper Weights

Choosing the right cardstock weight is crucial for successful die-cutting․ Lighter weights (65-80lb) are ideal for intricate designs and delicate cuts, offering flexibility and ease of use with manual machines like the Sizzix Big Shot․

Medium weights (80-110lb) provide a good balance between sturdiness and cut-ability, suitable for cards, tags, and layered elements․ Heavier cardstock (110lb+) requires more pressure and may necessitate adjustments to your machine settings, potentially straining the handle or gears․

Experimentation is key! Different brands and finishes will react uniquely․ Always test a small piece before committing to a large project․ Remember, consistent pressure is vital, and inconsistent pressure can ruin foil applications․

Specialty Materials (Vellum, Foil, etc․)

Expanding beyond cardstock opens exciting possibilities! Vellum, with its translucent quality, requires a light touch and sharp dies for clean cuts․ Foil, however, demands precise pressure – inconsistent force leads to frustratingly patchy results, as many users experience with the Big Shot and Glimmer machines․

Consider the Spellbinders Platinum 6 for superior foil performance; it’s a popular upgrade․ Textured papers can also be challenging, potentially requiring multiple passes․ Using a magnetic magic mat from scrapbook․com can dramatically reduce warping and improve consistency with these materials․

Always test a scrap piece first! Adjust your machine settings and consider using a slightly heavier cutting plate for optimal results․

Materials to Avoid

Certain materials can damage your machine or yield poor results․ Avoid excessively thick or rigid materials that strain the gears and potentially cause stalling, a common issue reported with the Big Shot․ Heavily embellished papers, like those with chunky glitter or thick adhesives, can also gum up the works and dull your dies․

Similarly, materials with a very sticky surface may adhere to the cutting plates, causing tearing and requiring extensive cleaning․ While some experimentation is encouraged, proceed cautiously with anything outside standard cardstock, vellum, or foil․

Protect your investment – and your sanity – by sticking to recommended materials!

Advanced Techniques & Accessories

Explore embossing folders, larger 9″ dies, and multi-layer designs to elevate your projects; textured impressions add depth and dimension to your crafts․

Embossing Folders & Their Use

Embossing folders dramatically expand the creative possibilities of your manual die cutter, adding texture and dimension to paper and cardstock projects․ These folders, used in conjunction with your machine, create raised designs without cutting through the material․

For optimal results, sandwich the embossing folder with your chosen cardstock, ensuring it’s centered․ Machines with a 6″ opening are generally sufficient for most embossing folders, though larger 9″ opening machines accommodate oversized designs․

Experiment with different folder types – from subtle textures to bold, intricate patterns․ Remember, consistent pressure is key for a clean, well-defined embossed image․ Embossing folders are a fantastic way to quickly and easily add a professional touch to cards, scrapbook pages, and other paper crafts․

Using Larger Dies (9″ Opening Machines)

9″ opening machines unlock a world of possibilities for crafters desiring larger, more impactful die cuts․ These machines comfortably accommodate oversized dies, perfect for creating statement pieces in scrapbooking, cardmaking, and mixed media projects․

When working with larger dies, ensure they are properly aligned within the machine’s opening․ Consistent pressure remains crucial, but the wider surface area may require a slightly firmer crank․

Consider the weight of your chosen material; heavier cardstock might necessitate extra care․ While not essential for all projects, a 9″ machine is invaluable if you frequently utilize extra-large embossing folders or intricate, expansive die designs, offering greater creative freedom․

Multi-Layer Die Cuts

Multi-layer die cuts elevate projects with depth and dimension, creating stunning visual effects․ This technique involves using multiple dies, often from the same set, to build up an image layer by layer․ Each layer can be a different color or texture, adding complexity and interest․

Precise alignment is key for successful multi-layering․ Consider using a light adhesive or repositionable tape to temporarily hold layers in place before adhering them permanently․

Experiment with foam adhesive between layers to further enhance the 3D effect․ Manual die cutters excel at this, allowing controlled pressure for clean cuts on each individual layer, resulting in professional-looking, intricate designs․

Textured Impressions

Textured impressions, achieved with embossing folders, add a tactile and visual richness to projects․ Manual die cutters are perfectly suited for embossing, offering the control needed for consistent results․ These folders create raised designs on paper, cardstock, and even foil, without cutting through the material․

Experiment with different embossing folders to achieve various textures – from subtle patterns to bold, dramatic designs․ Remember that the quality of the impression depends on consistent pressure during cranking․

Combine textured impressions with die cuts for truly unique creations․ The interplay of texture and shape adds depth and sophistication to cards, scrapbooks, and other paper crafts․